Slackline Setup Guide
This comprehensive guide will walk you through setting up a primitive slackline using basic equipment. Follow the step-by-step instructions below to learn the proper technique for creating a safe and functional slackline.
Quick Overview
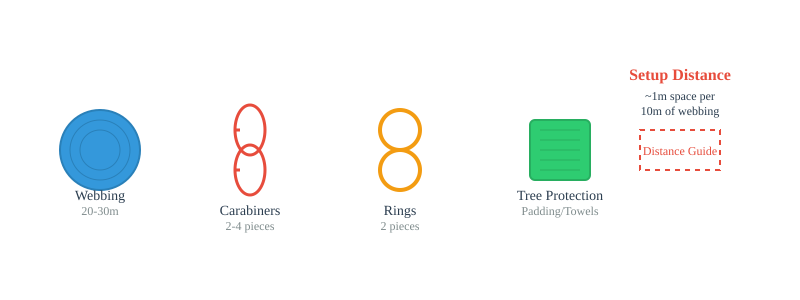
Setting up a slackline requires:
- 20-30 meters of slackline webbing
- 2-4 carabiners
- 2 rings for tensioning
- Tree protection (padding or towels)
- Two suitable trees spaced appropriately
Equipment Needed 📋
Essential Equipment:
- Webbing: 20-30 meters of slackline webbing
- Carabiners: 2-4 carabiners (minimum 2, extras for easier tensioning)
- Rings: 2 rings for the tensioning system
- Tree Protection: Padding or towels to protect bark
Color Legend
The diagrams use the following color coding:
- Brown: Tree Trunk
- Green: Tree Protection
- Blue: Slackline Webbing
- Red: Carabiners
- Orange: Rings
Step-by-Step Setup Guide
Step 1: Equipment Overview
What you'll need for a primitive slackline setup:
Here's what you'll need for a primitive slackline setup. The key components are the webbing, carabiners, rings, and tree protection.
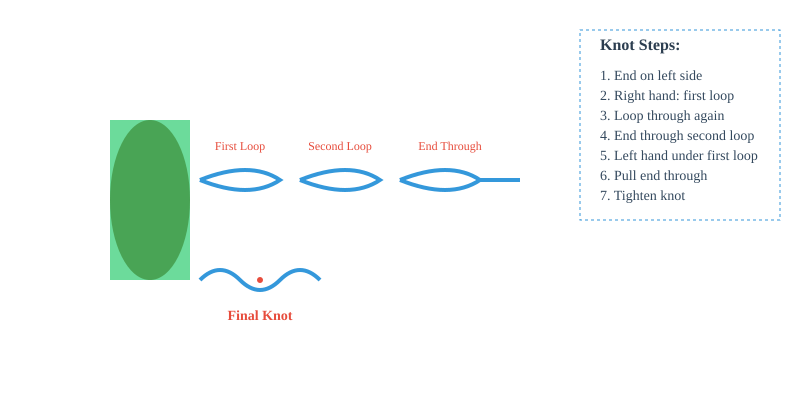
Step 2: Creating the Anchor Knot
Instructions:
- Place webbing end on left side
- Right hand creates first loop with twist
- Loop through second time
- End goes through second loop
- Left hand goes under first loop
- Pull end through first loop
- Tighten
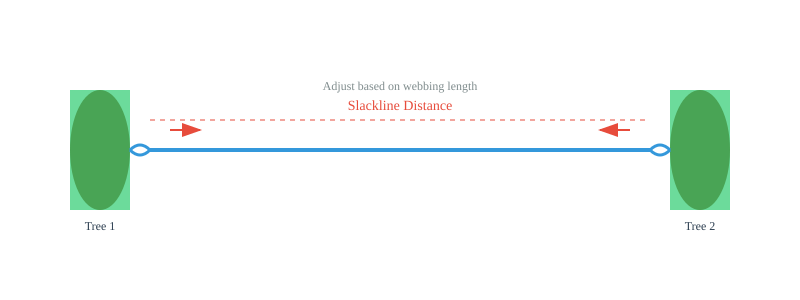
Step 3: Both Anchor Points Complete
Setting up the second anchor:
Repeat the same knot process on the second tree. Both trees should have protection padding and the same anchor knot. The webbing now spans between both trees.
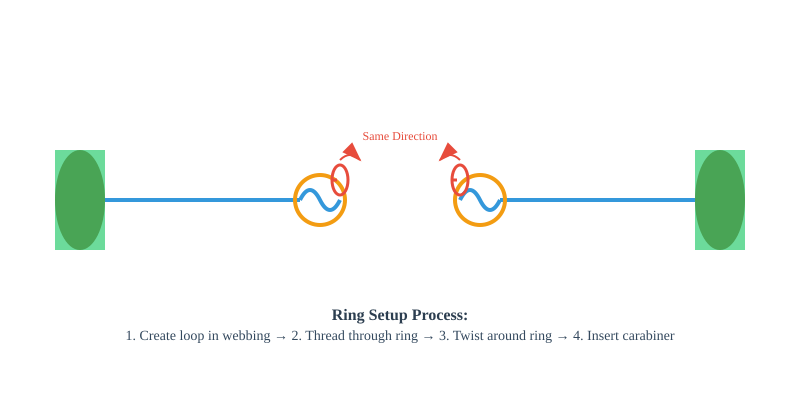
Step 4: Setting Up the Tensioning Rings
Preparing the tensioning system:
Create small loops in the webbing and thread them through the rings. Twist the loops around the rings to create space for carabiners. Ensure both carabiner openings face the same direction.
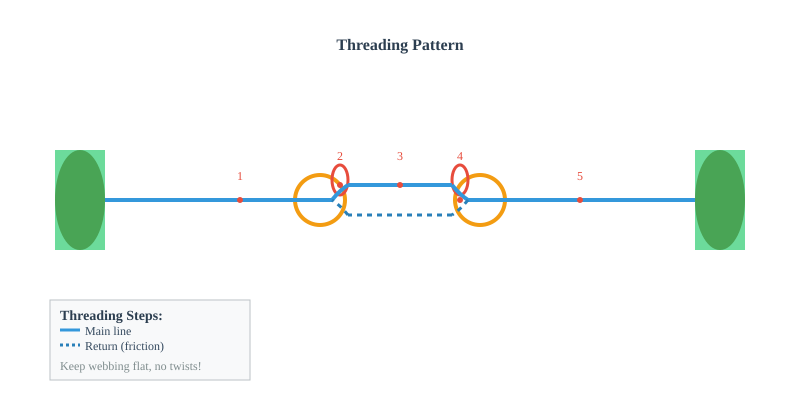
Step 5: Threading the Tensioning System
Threading pattern:
Thread the webbing through the carabiners following the specific pattern: bottom-to-top through first carabiner, top-to-bottom through second carabiner, then bottom-to-top again but underneath the first section for friction.
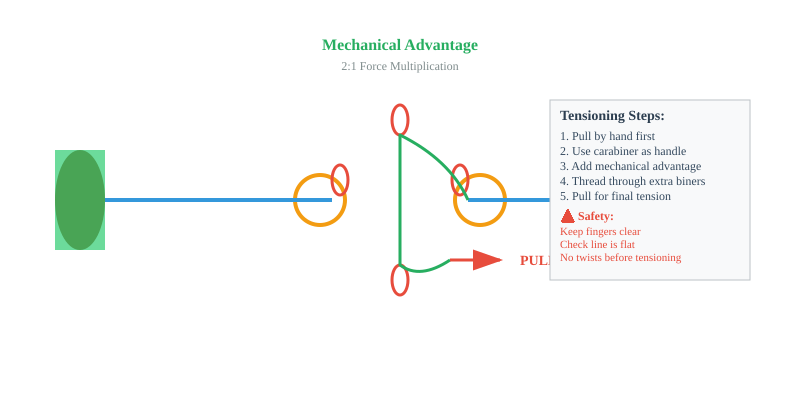
Step 6: Tensioning the Slackline
Building tension:
Start with hand tensioning, then use additional carabiners as handles for more leverage. For maximum tension, create a mechanical advantage system by threading the webbing through extra carabiners to multiply your pulling force.
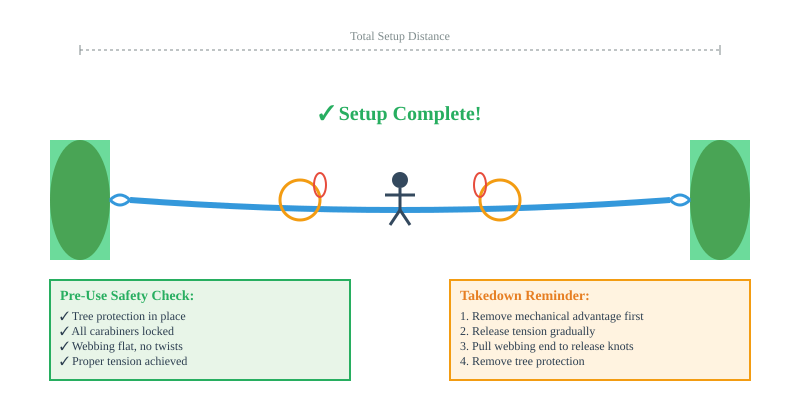
Step 7: Complete Slackline Setup
Final result:
Your primitive slackline is now complete and ready for use! The setup shows both anchor points, tensioning system, and proper webbing path. Remember to check all connections before use and always prioritize safety.
Key Success Tips 🎯
Tree Protection: Always use padding to prevent bark damage
Flat Webbing: Keep webbing flat throughout - no twists
Gradual Tension: Build tension slowly and check connections
Safety First: Test setup before full use
Safety Considerations
Before Setup
- Tree Selection: Choose healthy, mature trees with trunks at least 6 inches in diameter
- Tree Protection: Always use padding to prevent damage to tree bark
- Distance: Allow approximately 1 meter of space for every 10 meters of webbing
During Use
- Inspection: Check all connections and equipment before each session
- Progression: Start with low, loose lines before advancing to higher tensions
- Supervision: Beginners should practice with experienced slackliners
Environmental Responsibility
- Leave No Trace: Remove all equipment and padding after use
- Bark Protection: Never set up without proper tree protection
- Respect Areas: Follow local regulations and land use policies
Troubleshooting Common Issues
Line Won't Hold Tension
- Check that all carabiners are properly locked
- Ensure webbing is threaded correctly through the tensioning system
- Verify anchor knots are tight and properly formed
Excessive Bounce or Instability
- Reduce initial tension - primitive lines should have some give
- Check that the line is completely flat with no twists
- Ensure proper anchor height (usually chest level)
Equipment Slipping
- Re-tighten all knots and connections
- Check that rings are properly positioned
- Verify carabiner gates are facing the correct direction
Remember: Slacklining takes practice and patience. Start with shorter, lower lines and gradually progress as your balance and confidence improve.